How to Waterproof a Bathroom Floor
Waterproofing a bathroom floor is one of the most important parts of home maintenance—whether you’re remodeling, fixing a leak, or upgrading your space. If moisture seeps through the floor, it can lead to mold, structural damage, and expensive repairs.
Many homeowners don’t realize that floor leaks often connect with other weak points, such as shower bases or wall transitions. That’s why pairing floor protection with proper systems—like those explained in how to install a shower pan base—creates a complete moisture barrier. This guide explains how to waterproof a bathroom floor using modern, reliable, and budget-friendly methods anyone can follow.
Why Waterproofing Your Bathroom Floor Matters

A bathroom is the wettest area in any home. Water splashes, steam, and accidental spills can easily penetrate the flooring if the surface isn’t sealed correctly. A bathroom is the wettest area in any home. Water splashes, steam, and accidental spills can easily penetrate the flooring if the surface isn’t sealed correctly.
Over time, moisture can travel upward into walls or outward toward nearby fixtures, increasing the risk of hidden damage. Issues like peeling paint or ceiling stains often trace back to poor moisture control, similar to problems covered in how to repair a plaster ceiling. Proper waterproofing protects your subfloor, preserves surrounding structures, and ensures long-term durability.
Prepare and Clean the Subfloor

The first step in how to waterproof a bathroom floor is creating a clean, dry, dust-free surface. Any trapped moisture or uneven material can weaken the membrane over time. This preparation is especially important in full remodels or shower conversions, where floor height and slope matter—similar to projects like how to build a shower over concrete. A properly prepared subfloor ensures strong adhesion and prevents future failures beneath your finished flooring.
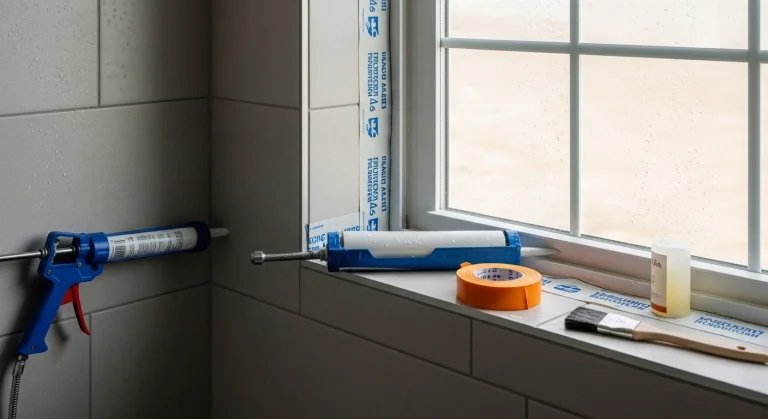
Seal Gaps and Transition Areas

Use silicone caulk to seal floor-to-wall joints, gaps around drains, and any visible cracks in the subfloor. These transition points are where water most often escapes, especially near showers and wet walls. Bathrooms with windows require extra attention, as moisture can move laterally into framing—an issue addressed in how to waterproof a window in a tile shower. Sealing these weak zones early significantly strengthens the overall waterproof system.
Waterproof Around the Drain

This is the most critical part of learning how to waterproof a bathroom floor. A poorly sealed drain can undermine even the best membrane. Use bonding-flange drain systems when possible and seal the membrane tightly around the opening. This step becomes even more important when installing prefabricated or custom shower units, as outlined in how to install a fiberglass shower. A secure drain seal prevents the majority of long-term water damage issues.
Install Bathroom Tiles or Flooring

Once waterproofing is complete, you can safely install your finished surface. Use appropriate thinset mortar, waterproof grout, and allow full curing time before use. If your bathroom includes furniture-style fixtures, moisture protection becomes even more important to preserve materials and finishes, especially with options like a dresser bathroom vanity. Proper installation ensures the waterproof layer continues working beneath everyday foot traffic.
Long-Term Protection & Home Value
A properly waterproofed bathroom floor doesn’t just prevent leaks—it protects your entire home investment. Moisture problems left untreated can spread into walls, ceilings, and even roofing structures, leading to repairs that rival costs discussed in how much does a new roof cost. Taking the time to waterproof correctly now saves money, extends material lifespan, and adds long-term peace of mind.
Conclusion
Learning how to waterproof a bathroom floor is one of the smartest steps you can take to protect your home from long-term moisture damage. When done correctly, waterproofing creates a strong barrier that safeguards your subfloor, walls, and fixtures from leaks, mold, and costly repairs.
Whether you’re completing a full remodel or upgrading a single area, proper preparation, quality materials, and attention to detail make all the difference. By investing time in a reliable waterproofing system now, you ensure a cleaner, safer, and more durable bathroom that adds lasting value and peace of mind to your home.
FAQs: How to Waterproof a Bathroom Floor
1. What is the best method to waterproof a bathroom floor?
Using a sheet waterproofing membrane provides the strongest, longest-lasting protection.
2. Can I waterproof a bathroom floor myself?
Yes—liquid waterproofing membranes are DIY-friendly and affordable.
3. Do I need to waterproof under the tiles?
Absolutely. Tiles are water-resistant, not waterproof. The membrane underneath does the real work.
4. How long does bathroom floor waterproofing last?
A professionally applied membrane can last 20–25 years with proper maintenance.
5. Is waterproofing required by building codes?
In many countries, yes—bathroom floors and wet areas must be waterproofed before tiling.